Spawns[]
- Clay Man
- Temple Guard
- Elder
- Young Vagrant (mini-boss)
- Archaic Wisp
Bosses[]
The Gold Chest[]
Sometimes, a gold chest is enclosed between two walls, if you manage to get to the same level as the chest, you can access it by going down a hidden rope and then going to the right
Secret Areas[]
Secret Dance Room[]

Secret Area.
This level contains a secret area found by going off the ledge past the cabin area (the bottom right keycard room) and entering a tiny crevice in the wall. In this area there are three golems dancing around a beatbox. Getting close to the beatbox will stop the normal music and play an electro-dance theme. This DOES NOT require the Photon Jetpack, but maybe having a couple Rusty Jetpacks can help thanks to the reduced fall speed. Any character with a "double" jump, such as Mercenary or Miner, can do it with proper timing.
To the left of the dance room there's a hidden hole in the wall, with 3 platforms and a higher ledge above. If you have at least 2 Hopoo Feathers and 3 red whips you can jump to the next ledge, which leads to another room with an unexplained invisible crystal that has a rainbow sheen outline.
Top of the Ship[]

General Tor's Head.
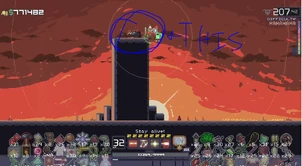
Another secret can be found in the top area. You must have Photon Jetpack or ~13 Rusty Jetpacks or 6 Hopoo feathers. On the top left area (just outside the "Level 6" door), fly up through the tiny hole in the ceiling and then go to the left. If this is done with Rusty Jetpacks, you must first jump onto one of the wires hanging from the ceiling, then jump through the hole. At the top of the pillar-like object, you can find General Tor's Head, from the popular indie game Iji (one of the inspirations for Risk of Rain).

Hidden teleporter.
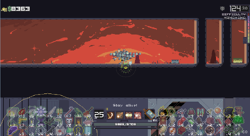
There is a teleporter sitting at the very top left; you can only see it if you have Photon Jetpack (see picture). It does nothing, but you can stand on it.
The top of the control cabin can be reached by heading right once on top of the ship via the "Level 6" hole note above.
Hole to Nowhere[]
There is a hole in the top of the Medical Bay (bottom left locked room). Jumping through it allows you to drop off to the left and end up outside the wall by the bottom timed door. There is nowhere to go except to eventually fall through the floor and be teleported back inside the ship.
Accessing Rooms Without Keycards[]
It is possible to access all 4 locked rooms with only one keycard.
Looking closely, the Storage room (top left) left side consists of a broken window. The top half of the window can be accessed with proper jumping/floating items via the path under the room, or by exiting out the top of the ship and dropping off the right side of "Level 6". You must exit the same way or consume a keycard to open the door.
The Cabin can be accessed by climbing outside the top of the ship, then jumping off the nose of the ship and heading left. The drop is short but you must travel ~1/3 of the ship's length to reach the outer ledge of the Cabin. There may be no way to exit the cabin without using a keycard; jumping off the ledge will typically teleport you back into the Cabin or into the Bridge (if it has been unlocked).
The Medical Bay can be accessed by going underneath the ship from the left, through some apparent walls. It requires a lot of jumping/speed items.
Map[]
This stage consists of the inner hull of the ship "UES Contact Light" and the immediate outer hull. It has three main sections: The Aft Bays, the Midships secured rooms, and the Bridge. Various little indicators on the ground will show you a map of the ship and where you are when you stand over them. They look like Engineer Mines.
Navigation around the map requires unlocking of large locked doors which are on timers similar to those of teleporters. The timers are 30 seconds on Drizzle and Rainstorm, and 45 seconds on Monsoon. It will trigger additional spawns while you wait for the countdown to end. Multiple doors can be activated at once in order to speed up clearing the whole level. There are 6 timed doors in all: One for each Aft Bay, an two in sequence to get into the Bridge. Three of the Aft Bays also have doors which can be opened from outside the ship with no timer, if you find yourself on that side.
Players can "rush" the map by activating a minimum of 3 doors to get directly into the Bridge and activating the Providence fight. Or they can clear it, searching for keycards, farming, and gathering items.
Aft Bays[]
Players spawn in the Aft Bays, which are four rooms stacked vertically along the left side of the map. Some can be exited through their top, bottom, or rear (left) sides, but it will almost always be necessary to use at least one timed door to access the rest of the ship because these exits just lead to one of the other Aft Bays.
The bottom bay contains many small unlocked boxes, almost always a golden Keycard chest, and sometimes a golden locked chest. The boxes can be used to great effect if the player has Bundle of Fireworks.
Midships Secured Rooms[]
In the middle of the map there are 4 closed rooms which require 1 keycard each to be unlocked - the top half has the Storage and Armory, while the bottom half has the Medical Bay and Cabin..
Storage[]
Storage contains lots of chests and containers. Some of the chests/containers are inaccessible without certain jumping items/abilities. It is also an effective room for taking advantage of Bundle of Fireworks.
Armory[]
The Armory contains a large Gauss Cannon that you can teleport to the final boss fight. Activating it while Providence is in front of it (or on the cannon's sprite) will deal a large amount of damage to him, his clone, or the Gilded Wurms. It has a long cooldown before it can be used again. The Armory also contains ten golden chests which have a chance to drop an offensive-themed item (but also a VERY small chance to spawn two items), as well as several normal chests/containers. These golden chests will not spawn Command chests if that artifact is active.
Medical Bay[]
The Medical Bay contains several medical beds with little cabinets besides them. Opening them will give you a large heal, as well as the chance of a medically themed item (known: First Aid Kit, Prescriptions,Soldier's Syringe, Mysterious Vial). These will spawn even if Command is active (confirmed). There is also a large surgical bed that you can teleport to the final boss fight. Activating it during the final boss fight will heal you, nearby allies, and your drones fully, although it has a long cooldown before it can be used again. There are also a few chests and a gap in the ceiling that leads off the map (see "Secret Areas" above).
Cabin[]
The Cabin contains a 'Nano-Chest' that you can teleport to the final boss fight; using it will give you a random use item. Like the others, it has a long cooldown. There are also several Roulette Chambers and Chests.
It is possible to become stuck in the cabin (and enter it without the use of a keycard) by navigating your way to the very top left of the map and heading right. When above the armory and storage, head over where you fight the final boss and drop off the edge. When you teleport back you will be in the cabin, where it is impossible to leave without a keycard, so farming until one drops is your only option if you have none and haven't opened the door.
Bridge[]
To the right of the map, the front of the ship is blocked by two timed doors which must be opened in sequence. Once inside, you will find a large room containing any items you teleported from the Secured Rooms and a computer asking to take you home. Press "A" and prepare to fight Providence. The computer acts like a chest and will trigger Bundle of Fireworks before and after the fight.
Soundtrack[]
Coalescence

Boss Fight[]
Precipitation


